Create a RESTful application with Spring Boot
SPRING INITIALIZR provides a visual web ui to start a Spring Boot project. You can select which starter will be added in the project you will create.
Open https://start.spring.io, search Web, Secrity, JPA, Validation in the Dependencies input box, select the items in the dropdown menus.
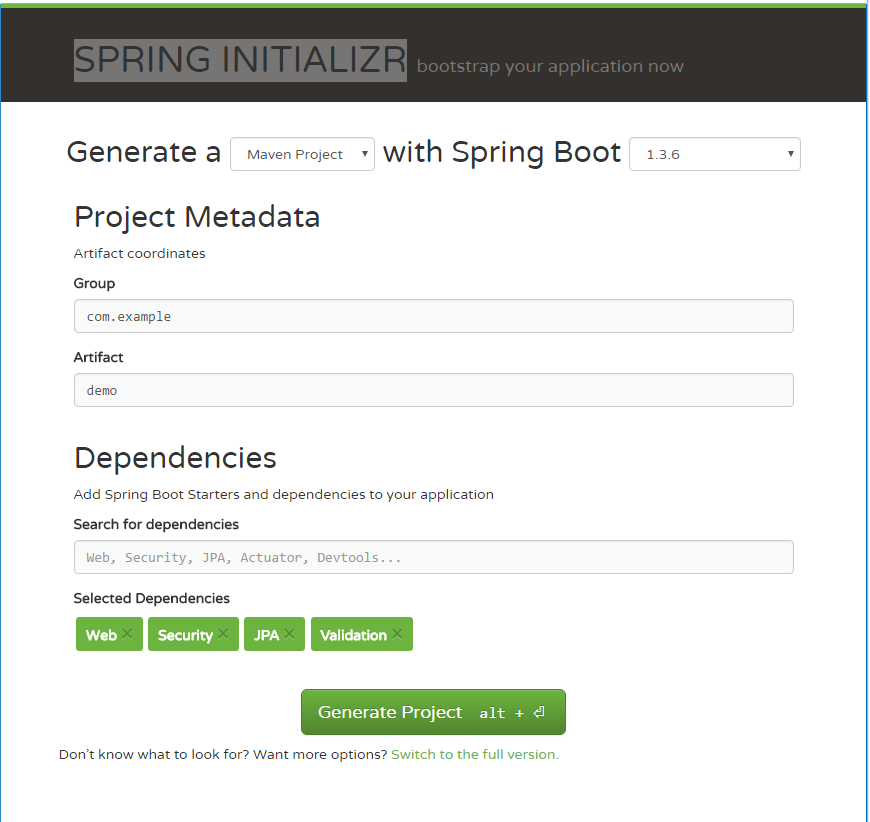
Then press ALT+Enter or click Generate button to download the generated codes in zip archive.
Extract the files into your local system.
As a start point, it only includes a few files.

- The Maven project configuration pom.xml, and several maven wrapper files which is like Gradle wrapper and use to download a specific maven for this project.
- A Spring Boot specific
Applicationclass as the application entry. - A dummy test for the
Applicationclass.
Open the pom.xml, it looks like:
<?xml version="1.0" encoding="UTF-8"?>
<project xmlns="http://maven.apache.org/POM/4.0.0" xmlns:xsi="http://www.w3.org/2001/XMLSchema-instance"
    xsi:schemaLocation="http://maven.apache.org/POM/4.0.0 http://maven.apache.org/xsd/maven-4.0.0.xsd">
    <modelVersion>4.0.0</modelVersion>

    <groupId>com.example</groupId>
    <artifactId>demo</artifactId>
    <version>0.0.1-SNAPSHOT</version>
    <packaging>jar</packaging>

    <name>demo</name>
    <description>Demo project for Spring Boot</description>

    <parent>
        <groupId>org.springframework.boot</groupId>
        <artifactId>spring-boot-starter-parent</artifactId>
        <version>1.3.6.RELEASE</version>
        <relativePath/> <!-- lookup parent from repository -->
    </parent>

    <properties>
        <project.build.sourceEncoding>UTF-8</project.build.sourceEncoding>
        <java.version>1.8</java.version>
    </properties>

    <dependencies>
        <dependency>
            <groupId>org.springframework.boot</groupId>
            <artifactId>spring-boot-starter-data-jpa</artifactId>
        </dependency>
        <dependency>
            <groupId>org.springframework.boot</groupId>
            <artifactId>spring-boot-starter-security</artifactId>
        </dependency>
        <dependency>
            <groupId>org.springframework.boot</groupId>
            <artifactId>spring-boot-starter-validation</artifactId>
        </dependency>
        <dependency>
            <groupId>org.springframework.boot</groupId>
            <artifactId>spring-boot-starter-web</artifactId>
        </dependency>

        <dependency>
            <groupId>org.springframework.boot</groupId>
            <artifactId>spring-boot-starter-test</artifactId>
            <scope>test</scope>
        </dependency>
    </dependencies>

    <build>
        <plugins>
            <plugin>
                <groupId>org.springframework.boot</groupId>
                <artifactId>spring-boot-maven-plugin</artifactId>
            </plugin>
        </plugins>
    </build>
</project>
- The package type is jar, which means it will include an embedded tomcat at build time. You can start the application via command line
java -jar app.jar. - The parent module is
spring-boot-starter-parentwhich is a BOM(Bill of material) and includes the declaration of Spring Boot dependencies. Just add the dependencies you want to use under thedependenciesnode. - Every starter will handle transitive dependencies. Besides those starters we selected, it also includes a starter for test purpose which will add the popular test dependencies transitively, such as hamcrest, assertj, mockito etc.
spring-boot-maven-pluginallow you run the project in the embedded Tomcat.
Another important file is the entry class of this sample application.
@SpringBootApplication
public class DemoApplication {

    public static void main(String[] args) {
        SpringApplication.run(DemoApplication.class, args);
    }
}
@SpringBootApplication is a meta-annotation, which is a combined annotation with @EnableAutoConfiguration, @ComponentScan and @SpringBootConfiguration.
@EnableAutoConfiguration enables the autoconfiguration detection by default.
@SpringBootConfiguration is similiar with @Configuration, it indicates the application is a Spring Boot application, and only allow one @SpringBootConfiguration in an application.
@ComponentScan defines the scope to find components, by default if not specify the package, it will scan the annotated class as base package. So it is recommended to put the Application in the root package.
Besides these, nothing! Where are the configuration files?
Spring Boot internally used plenty of auto-configuration mechanism to simplfy the configuration progress for developers. For this project, it configured a simple BASIC authentication by default. If you add a H2 database or other JDBC drivers, it will configure a datasource and transacation manager automaticially.
Till now, if you added some dependencies into pom.xml, you can start to code now. It is the quick way to prototype your application.
Although Spring Boot provides auto-configuration feature, but it does not prevent you to customize your configuration.
Create a application.yml in src/main/resources folder. It will override the default configuration.
server:
    port: 9000
    contextPath:

spring:
    profiles:
        active: dev
    devtools.restart.exclude: static/**,public/**
    datasource:
        dataSourceClassName: org.h2.jdbcx.JdbcDataSource
        url: jdbc:h2:mem:testdb;DB_CLOSE_DELAY=-1
        databaseName:
        serverName:
        username: sa
        password:

    jpa:
        database-platform: org.hibernate.dialect.H2Dialect
        database: H2
        openInView: false
        show_sql: true
        generate-ddl: true
        hibernate:
            ddl-auto:
            naming-strategy: org.hibernate.cfg.EJB3NamingStrategy
        properties:
            hibernate.cache.use_second_level_cache: true
            hibernate.cache.use_query_cache: false
            hibernate.generate_statistics: true
            hibernate.cache.region.factory_class: org.hibernate.cache.internal.NoCachingRegionFactory

    data:
        jpa.repositories.enabled: true

    freemarker:
        check-template-location: false

    messages:
        basename: messages

logging:
    file: app.log
    level:
        root: INFO
        org.springframework.web: INFO
        com.hantsylabs.restexample.springmvc: DEBUG
This is a classic application configuration file in YAML format.
It is easy to understand.
server.port specifies the port number this application will serve at start up.
Under spring defines DataSource, JPA, Spring Data JPA etc.
logging configures logging level for packages.
NOTE: Spring Boot also supports properties, groovy format for application configuration.
In the sample codes, there are some custom configuration classes.
The following configuration extends the JPA config in application.yml.
@Configuration
@EnableTransactionManagement(mode = AdviceMode.ASPECTJ)
@EntityScan(basePackageClasses = {User.class, Jsr310JpaConverters.class})
@EnableJpaAuditing(auditorAwareRef = "auditor")
public class JpaConfig {

    @Bean
    public AuditorAware<User> auditor() {
        return () -> SecurityUtil.currentUser();
    }

}
Due to DataSource is defined in application configuration file, this configuration class is very simple, the main purpose is configuring the AuditorAware bean for Spring Data JPA auditing.
The security configuration defines a WebSecurityConfigurerAdapter bean.
@Configuration
public class SecurityConfig {

    @Bean
    public WebSecurityConfigurerAdapter webSecurityConfigure(){
        return new WebSecurityConfigurerAdapter() {

            @Override
            protected void configure(HttpSecurity http) throws Exception {
            // @formatter:off
                http
                    .authorizeRequests()
                    .antMatchers("/api/signup", "/api/users/username-check")
                    .permitAll()
                    .and()
                        .authorizeRequests()
                        .regexMatchers(HttpMethod.GET, "^/api/users/[\\d]*(\\/)?$").authenticated()
                        .regexMatchers(HttpMethod.GET, "^/api/users(\\/)?(\\?.+)?$").hasRole("ADMIN")
                        .regexMatchers(HttpMethod.DELETE, "^/api/users/[\\d]*(\\/)?$").hasRole("ADMIN")
                        .regexMatchers(HttpMethod.POST, "^/api/users(\\/)?$").hasRole("ADMIN")
                    .and()
                        .authorizeRequests()
                        .antMatchers("/api/**").authenticated()
                    .and()
                        .authorizeRequests()
                        .anyRequest().permitAll()
                    .and()
                        .sessionManagement()
                        .sessionCreationPolicy(SessionCreationPolicy.STATELESS)
                    .and()
                        .httpBasic()
                    .and()
                        .csrf()
                        .disable();
            // @formatter:on
            }
        };
    }
}
The UserDetailsService and passwordEncoder are also declared as Spring components, Spring Security 4.1 can recognise them.
SwaggerConfig is no difference with before version.
Get the codes from my github account to view the details.